
Saving webpage as .webarchive file in Safari
The Ariel Atom and Ariel Nomad are unique and beautiful cars. In fact, they are so unique and beautiful I wanted to use images of them for desktop wallpapers.
While there must be other places to look for the images, for me the most obvious choice is Ariel North America’s website. They make the cars, so if anyone’s got great photos it’s them.
A lot of the high-resolution images on the website are available for download and they make for amazing wallpapers too. You just simply need to click on them.
That’s the easy part.
The difficult part is getting those beautiful images the site uses in the banners. You can click on them all you want, but you just don’t get a download or save option.
By now I should mention I was using Safari on my Mac.
First, I tried to save the whole web page hoping I could somehow get a Zip file with the images in it. However, Safari only allows web pages to be saved in two formats, Page Source and Web Archive. The first one merely saves the source text, while the second one saves the source text as well as the images and other contents. I went with the second format and got a .webarchive file.
Saving Page with Safari Format One: Page Source
 Saving Page with Safari Format One: Page Source
 Saving Page with Safari Format Two: Web Archive
Now the .webarchive file is not something that you can open using the stock macOS Archive Utility app, or the commonly used third-party app The Unarchiver.
Also, you might wonder if it helps to change the file’s extension name to .zip. It doesn’t.
Extracting content from .webarchive files with Terminal
One way to extract the images from the .webarchive file is through the Terminal app. Here’s how.
1 – First, press Command and space on the keyboard to launch Spotlight, type in “Terminal” and hit Enter. That’ll open the Terminal app.
2 – Then type in this command without hitting Enter. Note there is a space at the end after “html”.
textutil -convert html
3 – Lastly, drag the .webarchive file into Terminal. Hit Enter and you’ll find all the extracted files in the same folder where the .webarchive file is located. 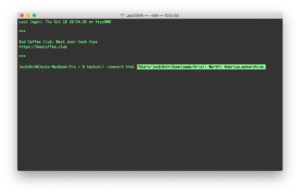
One more thing
Did I mention I was using Safari to download images from the website? It turns out it’s much easier with Google’s Chrome browser.
With Chrome, you can simply save the web page in the “Webpage, Complete” format and that’ll give you a folder with all the page content in it, including the images.
 Saving Web Page with Chrome
If there’s anything that I learned from this experience, it’s that Chrome is a better web browser. I mean, Safari and Edge are great too, especially when you use them to download Chrome.

The Terminal app did the trick! Thank you very much for the crystal-clear instructions!
Adrian
Thank you for the comment, Adrian! I’m really glad this was helpful!
Well, the conclusion is not really true. There are many pages that can’t be downloaded from chrome, but can be downloaded as webarchives in safari. So, when chrome works it is good, but there are many scenarios where it doesn’t
True! Personally I do prefer Safari!
Thanks, this is very helpful. The big benefit to this approach is that you get images in a usable format. Chrome and Firefox will download webp files if the site uses them, and then you need to futz around with other tools to be able to view those on a Mac. Using this approach is simpler, IMHO.