Apple’s AirPods and AirPods Pro earphones work like magic with other Apple products. It’s when you want them to work with non-Apple devices, say a Windows PC at the office, that you discover the process is not as easy. This is how Apple keeps users in its ecosystem.
However, using your AirPods with Windows PC is not impossible or in any way too difficult. Pairing AirPods to Windows 10 PC is essentially like how you would pair any Bluetooth device. Here’s how.
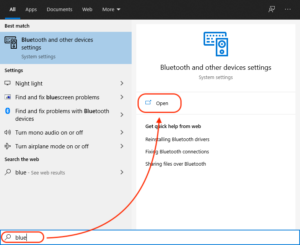
First, on the Windows 10 PC, go to the Start Menu, type in “Bluetooth” and hit Enter. This should bring up the “Bluetooth & other devices” screen.
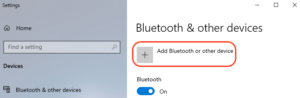
Make sure the Bluetooth toggle is on and click on “Add Bluetooth or other device”. The PC will start looking for nearby Bluetooth devices.
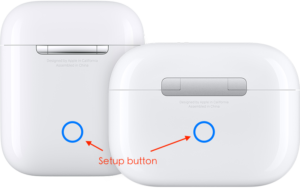
With the AirPods in the case and the lid open, press and hold the small setup button on the back of the case until the status light in the front flashes white.

The AirPods should appear shortly in the “Add a device” window. Note that it might first appear as “Headphones” before the name changes to “AirPods” or “AirPods Pro”.
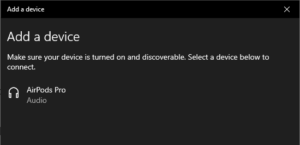
Click on AirPods to complete the pairing. You’ll now be able to hear your PC’s audio through the AirPods.